Friday, March 09, 2007

Smoking is cool
-statement not endorsed by the creator of this blog-

If you've ever wondered what my user icon is all about, then wonder no more as I am about to reveal all.


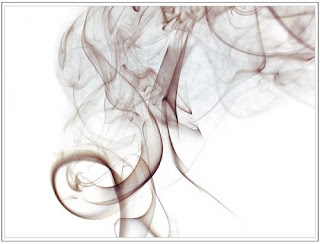
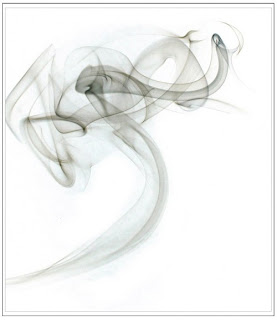
This is a photograph of smoke from an insense stick captured at high speed and if you'd like to have a go at this yourself then I have some tips that should help you on your way.

Ingredients

Insense sticks - Available cheap from lots of places, new age shops and the like.

Plant foam / Oasis - I stuck the insense stick into some plant foam to hold it, but there are other ways such as jam jars candle holders....anything.

Black card - Black, not white card to use as a backing for our shot. Local art and craft stores should help you out here.

Camera with flash.

Matches

Set up

I set up my backing card against a chair back and the plant foam infront of it with the insense stick in place. Mind you don't burn yourself or set anything you hold dear alight when you ignite your insense stick. They burn quite slowly so there should be time to get off loads of shots.

In the camera

I set my camera on a tripod and focused at a point just above the burning tip of the stick. As the smoke is always moving and we want to freeze the action, a fast shutter speed is necessary, 1/250 of a second or faster is ideal. We want to achieve crisp lines in the smoke as much as possible so a large depth of field is necessary. The pain here is that a large D.O.F requires a small aperture which means we need LOTS of light. I was able to work around this using the built-in fash but if you've got the means, studio lighting will give you all the illumination you need. You should play around with these settings to find ones that work for you and aim to get the background as dark as possible.

Post processing

Once you're thoroughly sick of wafting smoke about it's time to go to
Photoshop with the three or hopefully more nice smoke shapes you've captured. Open the levels adjustment window (Image>Adjustments>Levels) and move the black slider on the left towards the right until the black background is as black as possible without losing too much of the smoke. Next we need to invert the image (Image>Adjustments>Invert) This gives us a pure white background and a nice crisp dark wisp of smoke. At this point it might be necessary to clone out any unsightly grainy bits in the background using the clone stamp tool. If you want to add some colour to the smoke it can be done easily using the Hue/Saturation tool (Image>Adjustments>Hue/Saturation)


As usual, I welcome any questions.


Sunday, March 04, 2007


Infrared Photography


Photographing light in the infrared end of the spectrum can produce some striking and beautiful images and it's something that you can have a go at quite easily.

Equipment

The method I use for infrared (IR) photography requires the following:

1 – A digital camera capable of detecting light at infrared wavelengths*
2 – A tripod (For those long exposures)
3 – Infrared filter (I use a Hoya R72) check eBay, expect to pay between £15 - £30

*See the following web page for a list of various cameras to check if yours will work:

http://www.jr-worldwi.de/photo/index.html?ir_comparisons.html

Locations

Infrared photography relies on reflected IR light; it therefore works best on sunny days. I try to photograph with the sun behind me illuminating what’s in front of the camera. For me, the draw of IR is the white glow it gives to green foliage so I like to photograph trees and other plants. Skies and water are reproduced dark and buildings take on a ‘greyish’ tone. Anywhere that buildings and foliage/water/sky come together should produce interesting results. Clear blue skies with a few clouds look the best as too many clouds can wash out your image. Locations to consider include graveyards, castles and forests.

Exposure

The IR filter blocks too much of the visible light spectrum for your camera to automatically set the WB. If your camera has a ‘one touch white balance’ setting, make sure to use it. Take a WB reading from a patch of grass in direct sunlight (with the IR filter attached) this lets the camera correctly balance the colour of your shot.

You’re going to need to use quite long exposures to get your picture which is why you’ll need a tripod. Depending on my location I’ll use between 2 seconds to 15 seconds. I also prefer to use as long a depth of field as possible so with a small aperture that’s going to increase the shutter speed needed. Experiment to find out what works best for your location.

Focus

Focus can be tricky in IR but with the R72 filter, I find that just enough visible light is allowed through for the auto focus to cope. Using your LCD display becomes difficult in IR so you’ll have to rely on your viewfinder for composition and trial and error to achieve the correct focus. Experiment, experiment, experiment.

Post processing

I process all my IR shots in Photoshop. Curves, auto levels and channel mixer are my tools of choice. In the channel mixer, with ‘red’ in the drop down menu, set the red slider to ‘ZERO’ and the blue slider to ‘100’. Now with ‘blue’ in the drop down menu, set the red slider to ‘100’ and the blue slider to ‘ZERO’. This swaps the red and blue channels.
Fiddle with these setting to your hearts content to find results pleasing to you.


Further things to try

You can now buy cameras that have been specially modified to take infared photos. These cameras allow shorter shutter speeds and smaller apertures and can produce incredibly sharp images. Such cameras are unable to take visible light photos properly though so you have to be sure you can justify the expense to take purely IR images.

I welcome any questions and discussion.